Wednesday, January 27, 2010

the vestibule

Last weekend's project was supposed to be a cinch (and take no time). But after a late start and with a few obstacles in the way, what I thought would take a couple hours ended up taking two days.. to be fair Ben said it would when we started so he gets extra points for that.

Our little house has a very cute little vestibule and I really wanted to finish it..
Originally it was framed, painted and that was about it..
Unfortunately the small size makes it hard to photograph, but the vestibule is basically a structure made out of plywood. We decided we wanted to treat it like a transition into the house and felt the best way to do that was by insulating and sheetrocking to make it feel like a real room with real walls! The image above is an old picture.. you'll notice below that we had the floors refinished to match the rest of the house with the intention of finishing out the room.

Ben took on the insulating alone- leaving me to document the progress..
Once the insulation was in, three of the walls were fairly easy to sheetrock..
Ben opted to just install full sheets over the windowed walls and cut out the windows once they were secured in place..
Because the vestibule was an addition the exterior siding surrounds the front door.. as expected, sheet rocking over it was a little challenging.
Ben had to remove the doorbell..
He asked me to help him fish the wires through a piece of sheetrock, but after he gave me all of the instructions (don't touch the wires and don't let the wires touch each other.. or else!) we both decided it would be best if I didn't go near them.
Once the doorbell was back in place screwing the sheetrock into the siding wasn't really an issue, but it was the area above the door that proved to be the most challenging.
When we first looked at the space Ben declared he wasn't cutting sheetrock for that area because of the curve and all of the other details. So if he wasn't going to do it.. I guess I had no choice but to finish the job! So I approached the challenge as any good former art student would- I drew a template. Then I taped it onto a board of sheetrock and started cutting.
And I was so proud of myself.. it actually fit. Ben is marking the final details below- like where to cut out for the door.
Once I cut the door out, Ben tried to screw it in and the piece cracked in half. Unfortunately the very top of the wall is slanted where it meets the ceiling. Obviously sheetrock has no flexibility to it so as soon as he put a drill to it and tried to secure it to the slanted area it broke.

And with that, we called it a day. It was clear that sheetrock wasn't really the right material to use in that area, so we might go back to it with plywood but we may also just cover the area with the door casing- we haven't really decided yet.

Like all of our projects, this one is still clearly in the works. Next we have to install casings around the windows and other decorative molding. We'll paint the interior and exterior as soon as it gets a little warmer, install a new light fixture (I already have one in mind), and in the spring Ben promised me a new door to go with our new front steps!

Thursday, January 21, 2010

the mudroom

Last weekend I was lucky enough to be able to take off knowing that work was still being accomplished on the house, even in my time away. Ben had the entire weekend to himself, so he invited his parents up north to help- meaning they had a fun, "working" visit and I got a much needed insulating and sheetrocking break!

Now because I wasn't present during the gutting of the existing walls, insulating and sheetrocking I unfortunately cannot offer much dialogue, but luckily my mother-in-law was able to document the process along the way.

Gutting the Walls
Because the mudroom can be treated as an extension of the kitchen we felt it was important to re-do the walls out there like we had in the kitchen. Simply put, the sheetrock was brittle and begged to be replaced.
After gutting the entire space Ben and his dad discovered that the existing ceiling had been dropped- similar to the bathroom ceiling (I posted about that here). The mudroom appears to have been an addition and unfortunately the way it was constructed would not allow them to raise the ceiling at all.

Insulating
As was expected, no insulation was found in the walls or ceiling. The truth is that small space is often times colder in temperature than it is outside- having found many frozen diet coke bottles out there in recent months pretty much convinced us that the walls were absolutely hollow.

Because we're planning on creating a multi-functional space- think outerwear, cleaning supplies and random groceries, it was important to go crazy with the insulation. Because there isn't a heating supply out there the smallest amount of cold air that seeps in- the better.

Sheetrocking
While not much explanation is needed I would like to add that Ben has absolutely perfected his skill. If anyone out there needs a sheetrocker I would absolutely volunteer his skills- if he didn't despise doing it at this point.. I can't imagine why.
I do have to mention that while the guys were busy working in the mudroom my mother-in-law was hardly lounging. I left the house in a rush so she was left not only to clear out the stone debris from the living room but she had to move everything out of the mudroom before any work began- the mudroom had been serving as an extra closet, so there was plenty to take care of. Anyway, she made it very easy for me- I came home from a weekend away with a clean house (she had to clean the floors 3 times!) and a home cooked meal.. everything was greatly appreciated!

Monday, January 18, 2010

finished fireplace

And finally the big reveal!

Everyday last week the guys made significant progress..
Unfortunately their last day of work was Friday- meaning I had to leave town before I saw the finished product. But coming home to it last night definitely made it worth the wait!
Ben even had a fire going for my return.

Next up Ben and I will install a new, bigger crown around the top to create a larger mantle.

Tuesday, January 12, 2010

fireplace progress

The fireplace face lift is officially underway- a few days later than expected, but worth the wait! Here's the progress to date..

Preparing the Hearth
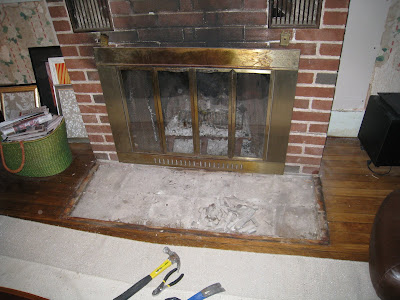
Originally old marble tiles served as the hearth- I posted about my mother-in-law scrubbing them clean here. All of her hard work hasn't gone to complete waste- we definitely enjoyed them while we used them, but with the new stone facade we opted to replace the existing tiles with a slab of blue stone. But before that could be done, Ben had to chip away at the old tiles and cut the floor to the exact dimensions that we wanted the hearth to be.

So while we started out with this..
after an evening of chipping the hearth looked like this..
and then Ben got out the saw and started cutting away..

Acclimating the Stone
Last week I had mentioned the stone was being moved into the living room. Cold stone really can't be cemented and affixed so in an effort to warm it up it was given a few days to adjust to the temperature of the house. Meaning our living room is now basically a pile of rocks..

Installing the Stone
So with the stone acclimated the hearth was set yesterday- unfortunately I missed my chance to photograph it but now you have that much more to look forward to when I post the big reveal! But this afternoon they started setting the rest of the stone and I thought you might enjoy a little sneak peek..

Wednesday, January 6, 2010

the fireplace

The fireplace face lift is happening this week! While I hope to have an update for you at the beginning of next week I thought I'd share a few pictures of the stone so you'll have an idea of what's to come!

Last week the stone was delivered- unfortunately I couldn't get out to photograph it fast enough..

But the pile was well protected from the elements.

We decided since the face was getting an update the hearth should as well. We've opted to go with a 2" piece of blue stone that's currently living in the garage.
I was told the stone would be moved into the house tomorrow to help the temperatures adjust. I'll try to post a few pictures as soon as it makes it's way into the middle of our living room.

Poor Henry isn't too happy we've moved around his furniture again but he's adjusting as well as can be expected.

Monday, January 4, 2010

weekend update

I hope most of you enjoyed a relaxing New Years weekend. Snowed in or not, it's a wonderful weekend to reflect and prepare for the year to come. Unfortunately, as usual, this weekend allowed us little time to sit, let alone reflect. Here's a quick day by day of what was done.. and why there was no time to nurse any hangovers.

Thursday
The plumber came and once again made our lives so much easier- he hooked up our gas range and our dishwasher.
Meaning we started our New Year off with a working kitchen- it's amazing how something so little can improve your lifestyle so much! So leave it to me.. I canceled our dinner reservations and made something that resembled a home cooked meal though there's still no sink so it wasn't all that easy.. not to mention most of our kitchen supplies are still packed up in the garage.
Don't the red Solo cups just make the tablescape?!?!

Friday Morning

New Years Day and we were up early- according to me, but if you ask Ben, we slept in. Ben got right to work as I enjoyed a cup of tea. He was in the shower trying to clean up a little grout residue. Looking back you'll see we haven't done much in the bathroom recently. In fact the last time I brought up Ben's tile grout job was here.. months ago. And it's taken us that long to actually get back to it. We knew when it was done that it had to be touched up just a little (which is why we opted to hire a professional to do the floor)
and this weekends project proved to help. Ben lined the floor and protected the new bath fixtures before using Acid Sulfamic Cleaner on the tile. I steered clear of the area (he was well protected with a mask) because of the chemicals so I wasn't able to take any good pictures. But it helped tremendously. Now we need to get a few spots with a razor but other than that it looks great. While in there Ben also caulked around the perimeter of the tub.

Friday Afternoon

Jason from Progressive Finishes was back to install the crown and the base around the cabinets. As usual the afternoon didn't go as planned and it was looking like my "full" height cabinets weren't going to look so full height. Kraftmaid provided us with a two piece crown- which normally would have been fine except that our ceiling is not perfectly level (remember we went with the wood paneling.. I posted about it here). Because our ceiling isn't level the filler has to be installed and a crown has to be applied on the face of it. With a two piece crown (pictured below), it can only be mounted on the top of the filler, not on the face.
And instead of me just letting the issue go.. Jason patiently let me try to work it out in my head. Normally I'm easy to work with but because the ceilings are so low in our house to being with it was even more important for us to have full height cabinets- the lower they hang the shorter the room feels. I just knew there was a way that it could be done somewhat easily and the way I wanted it done originally- full height! So we came up with a solution- we decided to go with a regular crown that we'll mount around the cabinets and the full perimeter of the room- giving the cabinets the full height look I was going for and the easier install for Jason because he won't need to work with the two piece crown!

Of course all that means I now need to buy crown.. so the cabinet installation still isn't complete. But as I always say.. practice patience! I don't mind waiting if it means it will be done the right way in the end.

Saturday

Saturday was literally spent in the kitchen. Ben installed the microwave- which by the way also serves as a convection oven.. I even baked cookies in it to make sure that it worked!
And I unpacked kitchen boxes, ran the dishwasher, unpacked some more and ran it again.. over and over. We finally have plates and flatware- and glasses.. oh my!


I'm sure they'll need to be moved again, but Ben's been eating off of paper for four months (usually we're much more sensitive to the environment) and I could tell he wouldn't last much longer.

Ben also hooked up the tv for me!
Sunday
And Sunday we took a break.. from the kitchen. When we first bought the house Ben and I had an agreement and me insulating was not part of it. But like our budget all agreements were thrown out of the window as soon as we closed. Turns out, I too have to get down and dirty. It's no fun, but better for Ben that he doesn't have to go it alone.

Our day started out in the attic where insulation was greatly needed. Originally Ben told me all I had to do was cut and hand him the insulation. Within minutes I was on my hands and knees guiding it through the nailing strips, securing it into place.
I know we didn't do a good job- Ben even said it as we were cleaning up. But really- it was my first time and I wasn't even supposed to be there! I wanted to go to the movies. But I have to admit it is worth the pain and suffering if it brings our heating costs down.