Showing posts with label demolition. Show all posts

Friday, September 25, 2009

prepping the kitchen

I'm in the process of designing the kitchen (more to come later), but in the meantime some adjustments had to be made in the space in order for my design to work. The biggest issue? The extra door into the bedroom (and right smack in the middle of my "U" shaped design).

Below is a rough floor plan of the house so you can see what I'm talking about..
(not to scale)
The bedroom to the top right has two door openings, one coming through the hall and one through the kitchen. In an effort to make both rooms more useable (at the moment the bedroom has very few furniture walls because of the doors and windows), we knew we needed to close off the extra doorway.

You can kind of see the actual door orientation through the picture below..
On Saturday Ben started hacking away at the existing door frame. He didn't get very far in terms of filling in the wall and installing studs- by the time the frame was out we took a dinner break. But he says the few more steps he needs to take aren't too involved- he keeps saying he knows what he's doing..
Apparently there was also a panel on the kitchen wall I had never really noticed before. You can see all of the left over adhesive on the wall.

I hope Ben will take pictures as he continues to work on it.

On Saturday Ben will officially become a Saratoga resident. He's starting a new job next week and I, unfortunately, am going to be living the life of a single New Yorker until all of my business is wrapped up. I'll join him here and there, as I can, and he'll be back in the Manhattan area most weekends. But until our boxes are packed and the truck arrives, I'll be sleeping on a bed in a very well furnished apartment, eating dinner made out of our All Clad pots and pans and he will be resting on an air mattress, watching tv on the floor and eating cheap take out most nights. And did I mention doing hard labor after work to finish up the house before I arrive?

Friday, September 18, 2009

demolition days- garbage removal

On Tuesday morning the dumpster arrived..
We had planned on leaving Saratoga and heading back to the city on Thursday afternoon so that meant we had 48 hours to go crazy and fill that baby up!

You might be thinking "what perfect planning on their part!", but don't give us too much credit. We really went back and forth on whether or not it was worth it for us to have a dumpster delivered so early in the renovation process, so we didn't plan ahead. It wasn't until our second day there when the garbage started piling up and it was hard to determine what was trash and what should stay, that's we decided we should have one delivered. We were looking up garbage removal companies (our county dump required us to get a permit- a lengthy and sometimes pricey process), but because it was Labor Day weekend, we were out of luck (I'm sure if we were doing the renovation in New York City we'd get a response pronto but upstate they like to have their holiday weekends). So on Sunday we really started to feel like it just wasn't going to happen when we got a visitor. Literally I'm not even kidding, a man was driving by, noticed we had just purchased the house, pulled up and told us to let him know if we needed anything because he owns a waste removal company! Welcome to the neighborhood!

Once the dumpster was dropped on our driveway the first priority became filling it. During the first few hours cleaning, landscaping and stripping wallpaper took the back burner.

Brush
Ben was told that we should load the brush in first- mostly because it would flatten out with all of the other garbage on top.
The guy who delivered it also suggested that we hold out that larger trees because he would use them for firewood. Because we were being charged for the dumpster rental and the weight of the garbage, the more he took the better- he was saving us money and we were giving him free firewood, so it all worked out.

Radiators

If you haven't noticed, there are radiators throughout the house- a sure sign that it was built in the early 1900s!
I really hadn't considered the radiators and how we were going to treat them during the first walk through and inspection of the house. In fact, I wasn't even sure what we were going to do with them until the demolition process began. My father in law mentioned that the wooden radiator covers (all existing) are really just like blankets over the radiators. They make the heating process in the house much less efficient because the heat is often times trapped inside the covers and very little is able to escape.
First reaction? Toss them! I want this house to be as cost (and energy) efficient as possible- there's no reason to waste gas.
Once we removed all the radiator covers I started feeling as if the old radiators were less intrusive- the rooms felt and looked bigger. I also wanted to embrace the fact that the house is old. And I think it the end I might really like the look of freshly painted (vintage!) radiators.
Originally when we decided to get rid of the covers we started putting them outside just to get the out of the house. Remember this picture?
But as soon as the dumpster arrived Ben took a mallet to them (he saved a couple for me) and broke them into pieces so they wouldn't take up too much room.

Kitchen Cabinets
We were debating whether or not we should keep the base cabinets with the sink because realistically we may be without a kitchen for some time, but we also wanted to take advantage of the dumpster- we aren't sure when we'll have one again. We decided the sink was too valuable (and because we are keeping a row of cabinets there the floor didn't have to be finished underneath them), so we kept the base intact. The upper cabinets were another story.
I'm not exaggerating when I say they were being held onto the wall with two, very old screws. And even more crazy than that- the top of the cabinets was actually just a piece of plywood set inside (not attached).

There are two corner pieces in the kitchen that are original to the house and for a couple minutes I thought that was a reason to keep them-
then I changed my mind. The thing is, I use my kitchen, so it better suites me if we continue the kitchen around to those corners (I'm hoping to install a "baking" station in one of them- an area I'll use frequently).
As you can see above, Ben tried to remove them, but that's when he discovered that they are so original to the house that they're built into the wall! As soon as he began tugging at the shelves with a crowbar, the wall started pulling away. So instead of making it into the first round of the dumpster he decided to save that project for a rainy day.

Miscellaneous Garbage

There was so much of this I'm not sure I'll remember to post about it all. It all ranged from being either dated, completely broken or just overall ugly. Here's a quick list..
The TV antenna..
One of Ben's more brilliant moments..
The window treatments..
First I made sure none of them worked with our new decor.
The ridiculously heavy garage heater..
We literally rolled it down the driveway and somehow wedged it into the dumpster- still not sure how that worked but I'm pretty sure that's where my shoulder injury stemmed from.

The stairs that were literally disintegrating..
Ben built this temporary set to make it through the winter.
They'll be great as soon as the floor guy sands down the top step because you can't open the door at the moment.. (he never claimed to be a carpenter!)

Believe it or not, those few items were enough to fill the dumpster.. and clear out the house. On Thursday morning our time was up and while we were packing up to head back to the city, they picked up the full dumpster and the extra wood..
Suddenly our house looked a lot less like a construction site and a lot more like a home. Our week up there had come to an end and while it might not look like we made a huge amount of progress on the computer screen, you'd be amazed at the transformation if you saw it in person. And it's just the beginning!

Thursday, September 17, 2009

demolition days- stripping wallpaper

There are a few ways to remove wallpaper- but in our house there were really only three options we were considering:

1. renting a steamer
2. applying a chemical wallpaper remover
3. spraying a homemade water/vinegar mixture

Notice hiring a painter is not on the list..
I'm not sure how we came to the decision that the water/vinegar mixture would be best for us- it's very possible that it was as simple as cost and availability. And even though it did work out in the end, I'm not going to tell you I didn't want to throw in the towel more than once. Wallpaper removal is time consuming, overall irritating and for someone who isn't the least bit patient, it's absolutely frustrating.

Let me first give you a little information about the way Ben and I work. While we haven't yet done a project of this magnitude together, we have done plenty of painting in the past (I made Ben repaint our apartment more times than I can remember), so we are very familiar with each others techniques.

Leah's Technique
I'm a trained painter (ie watercolors/acrylics), but that doesn't mean my patience in the studio is easily translated when working on a room. I also happen to be very rash and abrasive. I've been known to run around- and into walls because I'm a fast mover and prefer to do a million things at once instead of nothing at all. But all of those qualities are horrible companions to my wanting everything to be perfect! No, I'm not a perfectionist- I'm all about living and I'm ok if things get dirty or are moved out of place, but I must say, if our walls are not smooth it will bug me forever!!!
And it is exactly for that reason that I took the wallpaper removal VERY seriously- going over areas more than once, while mumbling that we should have hired someone instead.

Ben's Technique

Ben's a do-er when it comes to anything exterior, building, demolishing, but he just can't stand the "finishing" technique. Let me clarify- he's sloppy. And I've said it to him before (in fact we have the paint marks on our ceiling to prove it), he just doesn't have the patience to finish a space. Maybe I'm demanding, maybe I ask too much, but the truth of the matter is we should both stick to what we're good at- and he's good at many other things.
I tried desperately to teach Ben the "proper" stripping and pulling technique- hoping to not break the wallpaper panel on the way down, but he preferred the shredding and knifing technique, taking chunks of wall out in the process. And I'm not sure it wasn't on purpose because every time a chunk of wall hit the floor he'd say something like "oh I'll patch that, not a big deal", or "the sander will take care of that in a minute"- should I mention he gets pleasure out of both patching and sanding? Or is that a given?

So with that all said, there were three rooms that we had to strip the wallpaper in and I started out with the wrong one...

The Living Room

Originally (or I should say when we first saw the house), the Living Room had this fun wallpaper on the walls. I actually really liked it, and could see myself using something similar in another room- at another time. But as you can see, the panels were already coming off in full pieces..
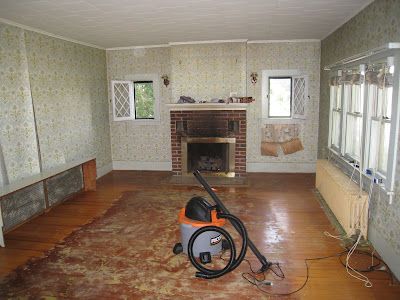
So I easily removed the top layer- knowing that there was another layer underneath. I figured I could use the scoring and stripping method on the second layer and while I knew it would be time intensive I still didn't think it would be too hard.
But when I got to the first layer off, I discovered that underneath it was not just a second layer. In some cases the second layer came off with the first, revealing a third layer, in other cases the second and third layer came off, revealing a fourth layer.. we've counted seven layers!!!
But I continued to try to remove it- even when I discovered the previous owners had actually patched and repaired the walls over old layers of wallpaper!

After about 30 minutes of struggling.. I gave up. Having only gotten a small area clean I told Ben it just wasn't going to happen- and even if it was something I could have completed, the walls would have been in horrible shape- pieces of plaster were falling out from all directions.
Fight #1: I remember Ben accusing me of being lazy for giving up and saying it wasn't possible to do the whole room (he doesn't remember it this way). We finally got a second and a third opinion and everyone agreed with me- we have to install new sheetrock, there's just no avoiding it.

So while I was tackling that frustrating space, Ben was working on other areas of the house. After our little "argument" I made my way to the office, where the wallpaper came off the way I thought it should..

The Office
Ben was prepared and gave me all of the important tools I needed to remove wallpaper- a spray bottle, paper tiger and scraper. Now you may ask, what is a paper tiger?
This is a paper tiger:
It's a tool that can be used to score holes in the wallpaper you want to remove. Once the holes are punctured, it allows for the liquid (water/vinegar or chemical stripper) to soak into the back of the paper and loosen the adhesive. This tool is especially helpful today because many of the wallpapers out there are vinyl- great for the "active" home, easy to wipe down and can withstand almost anything!

Now the thing about the paper tiger is, I didn't use it. I felt like it was an extra step I just didn't want to take- I decided when I first tried it that it just wasn't that efficient (most people would argue that). Also the top layer of the office wallpaper came off really easily- leaving the lining and the adhesive fully exposed.
The picture below shows the wallpaper on the left and the adhesive layer on the right (the walls are actually green when all of the paper is stripped)..
All in all it took me an afternoon and the next morning to strip the walls in this room by myself. I'll admit that by the end of the first day the vinegar stench was getting to me. I was definitely not happy to be there (believe it or not I was wishing to be back in the city), and I was absolutely dreading waking up the next morning to finish. But I sucked it up and got it done- and the truth is, even without the perfect paint job, the room still looks a thousand times better..

The Bedroom

After the office experience I was able to convince Ben to make the bedroom a team effort. This is where I truly got to experience his wallpaper stripping technique.
We discovered after beginning to strip the paper from the top that there appeared to be another layer underneath, but don't worry the second layer didn't continue down the walls- it was only up by the crown molding. After taking a few strips down we figured out that the original wallpaper was plastered over and the newer wallpaper was installed over the plaster. Just perfect!
You can see a hint of the original layer in the top right of the photo above (I blew it up below)
Before we begin the painting process we'll have to patch all along the crown moldings to try to even out the wall surface and cover up the hint of leftover wallpaper.
Notice all of the "shreds" piled on the floor?
That was all Ben's contribution!

The Bathroom
I should also add that the bathroom was not left out on purpose. If you haven't noticed from past posts, it was not forgotten when the previous owner decided to decorate..
Lovely, isn't it?
I did start stripping it, but it didn't come off easily. I was preparing myself for a struggle when Ben mentioned we'd have to replace the walls anyway with durock behind the tile surrounding the bath tub (yet to be installed) and moisture resistant sheetrock to replace all the other walls. A tough job, yes, but Ben said it's necessary in order to prevent mold growth. I must say that was a relief.. so I considered it done and called it a day.

Side Note
Just in case you're wondering- even with the windows wide open, the rooms still reeked of vinegar. Ben wiped the walls clean with water (an absolute necessity to remove the excess vinegar and adhesive). Once we're ready to paint we'll patch and sand the walls and then wipe them down again with a soap and water mixture- also recommended by all of the professionals!

Wednesday, September 16, 2009

demolition days- floor removal

As I mentioned earlier this week the floors were so filthy it was almost nauseating. My sister tried to calm my nerves by suggesting we live as we did at camp- with flip flops attached to our feet at ALL times. First I must say that we LOVE camp, so she assumed that comment would make me feel sentimental and that my use of flip flops may even be enjoyable, but while it was tolerable for a week anything beyond that just wouldn't be fun.. maybe because I was wearing flip flops in my own home! Don't you remember those sad days when the summer season was over and your parents picked you up and drove you home. Yes, you had to say goodbye to your friends, but you also got to scrub your feet!!

Anyway, we opted not to tackle the vinyl tile in the hall- we ended up figuring out that it would be more cost efficient for us to install all new, REAL hardwood floors over the vinyl than to salvage what was underneath. But we did get to pull up the lovely carpeting in two rooms- which obviously helped with the musty smell, and pulled up the vinyl in the kitchen.

Here's how it all went down..

The Living Room

So unfortunately I don't have any action shots of the lovely green shag being removed, but here are some "before" and "after" shots..
before
after
Removing the carpet in the Living Room made the biggest difference. Immediately I could start to see what I had envisioned all along- a big, open space with lots of character and even more potential. This was also the moment we discovered the first of many "short cuts" that the previous owners had taken during time in the house.. notice how the perimeter was more recently refinished? Even though I'm sure it saved lots of money I wouldn't suggest refinishing a floor around an existing area rug. I mean what if you decide its time to replace the rug?

The Office
The blue wall to wall carpeting in this room was almost as beautiful as the green shag.
Unfortunately ripping up this carpet revealed another layer of vinyl instead of the beautiful hardwood we had hoped for.
same room- picture taken after wallpaper was removed

What a lovely view in the front yard!
By the way, for those of you who are looking to try this at home.. removing carpeting isn't as easy as it appears to be in the pictures above. First of all, make sure you know what you have underneath- because it could be plywood and then you're out of luck. Also, if you haven't seen wall to wall installed before, let me just brief you on the steps- meaning you have to remove all of these as well..

1. Hammer down tack strips, which basically means these are hammered down around every inch of the perimeter of the room.
This is where a crowbar comes in handy, though this isn't an easy job. In our case it was almost like time made the strips especially brittle and they kept breaking instead of coming up cleanly.

2. Padding is installed before the carpet and believe me, it doesn't stay down by itself.. you guessed it, a million staples are used to hold it in place.
I found that a screwdriver was the easiest way to remove the staples, but it is a time intensive project because they're easy to miss.

3. Finally the carpet is cut into place and tucked around the tack strips. The strips have little spikes of them that grasp onto the lining of the carpet.
Because the carpet is the uppermost layer you can easily cut it down the middle and remove it piece by piece.

The Kitchen
The vinyl floor in this room was already peeling up from all corners so removing it took only minutes..
Another shortcut here- there were two layers of vinyl. First hint that the owner didn't believe in stripping anything, only applying and reapplying. But underneath were the same floors as in the Living Room, so that too made a huge difference.
We were really lucky to have hardwood under all of the surfaces, though we weren't entirely surprised because that is typical in most old(er) homes. We knew early on we wanted hardwood throughout because while it's great for resale, it's also what we prefer- Ben from a comfort standpoint and me in terms of design. But like I mentioned all of the vinyl floors in the hall and the bedrooms created a little bit more work than originally expected. When pricing it out we discovered that it made more sense for us to just install new boards over the vinyl towards the back of the house.

The Vestibule

We also opted to have the vestibule floors refinished to match.
Because the house isn't what I'd call big, in any sense of the word, it was important to me that the rooms flow and the best way to do that is in keeping with the same floor finish.

Refinishing the Floors
As a designer the best installation is one that is done when the client isn't there to witness the "steps" and that is exactly what we opted to do with the floors. While we are in Manhattan our floors are being finished in Minwax's Jacobean finish..
And I just can't wait to see the transformation!

Monday, September 14, 2009

demolition days

So we basically spent every minute of last week doing demolition- or as I like to refer to it.. hard labor. Only taking breaks to eat, sleep and make Home Depot runs. Ben had a blast- he started off the week with a chainsaw, cutting his way through the overgrown yard. I, on the other hand, was introduced to the house with a bottle of bleach and some scrub gloves.. not so much fun. In six days we made our way through much of the yard work, were able to strip wallpaper in most of the rooms (there were a few bumps along the way), we filled a dumpster, met with a contractor about the kitchen, a plumber, a wood floor finisher and had our new washer and dryer delivered (hooray!).

Feeling a little overwhelmed at first, I started keeping track of our progress by writing down what we did every day. Most days looked something like this:

Henry is having a hard time adjusting- turns out he only likes being outside if we are constantly by his side. He hasn't really taken to it like we had hoped, but I guess it's still early. He did discover digging holes- something normal suburban dachshunds do from early on but with our lack of yard space in Manhattan his digging instincts were a little delayed.. I guess that's a mothers way of saying he's a slow learner. We took lots of pictures of his bottom in the air..
we were quite proud, though I'm sure we won't be when our yard begins to resemble a slice of swiss cheese.

And as I had mentioned in my brief post last week all of our neighbors were incredibly welcoming. Everyone seemed thrilled that we'd taken on this project, as the house has been vacant for so long- and the truth of the matter is, it was quite an eyesore and it still is.. I'm not going to pretend we did THAT much over those six days, but even the little that we did do has already made a huge difference.

In an effort to give you a little taste of how we spent our week I'll post some projects we started to conquer (or at least tried to) over the next week or so- providing you with "before" and "after before" pictures. I'm referring to them as "after before" shots because the true before and after pictures are months, if not years, away and believe me, none of what I'm going to show you is the final product, Ben and I are way to invested to settle.. so keep that in mind.

In the meantime, I'll start out this week with a little bit about our living conditions.. remember we were there almost an entire week. And just a little bit of info for those of you who don't know me.. I don't really know how to "rough it" if you know what I mean.

The Floors
"before" floors

I opted to just cover the floors with paper. For the most part they were covered with old vinyl tile.. what were they thinking?!?! there are beautiful hardwood floors underneath!! After years of use (and then non-use), the tile was filthy and just not anything that could be cleaned. A mop seemed to just move around the dirt and I just didn't have the time or the energy to work on them. I also knew the floors were being redone this week and didn't want to spend my week cleaning something that was being replaced just days later.

The Bathing Quarters
"before" bathroom

OK, I'll admit it.. I got a little carried away with contact paper. But I'm sorry there's nothing grosser than cleaning/using an old, dirty bathroom. I tried to make it as sanitary as possible, but cleaning has never been my forte, so I discovered early on, that the easiest way to make an old surface clean was by covering it.. so I did a lot of that..

I lined the medicine cabinet..

the linen closet..

I even covered the floor..
Obviously we're planning on replacing everything- the tiles have been ordered and I'm shopping for bath fixtures this week.. but at least we now have a somewhat clean bathroom and hot water- we were without for a couple of days.. gotta love cold sponge baths!

The Eating Quarters
This was a little tricky since we didn't acquire any appliances with the purchase of the house. My mom helped by bringing up a mini refrigerator and a toaster and we also have a grill, but we basically decided day 1 that we would spend most meals out. But that didn't mean we could be without a "kitchen" for a whole week.. we still needed a place to keep drinks, feed the dog- but most importantly we needed a place that would be safe enough for him to stay while we were working on the rest of the house.
Henry hanging out.. waiting for us to finish the days work.. and no, he isn't an Eagles fan- he prefers the Patriots these days

Once the vinyl floor was pulled up (more on floor removal in future posts), I lined the floor with paper..
and covered what cabinets (and work surfaces) I could with- you guessed it, contact paper..
Little side note: notice the candle hanging out by the sink? I literally didn't go a day without lighting at least 6 of those babies throughout the house.. it's going to take a lot to get the musty smell out of there- opening windows helped, but there's still a ways to go.

We were able to find a cute orange desk at Walmart on clearance that serves as our temporary dining table- just love how it works with the white Target folding chairs..
Ben and Henry enjoying a breakfast of toast with Dunkin Donuts.. no coffee maker in this house!

Just fyi, we really don't normally eat breakfast with Henry like this. We just thought it was funny that he was trying to join us and took advantage of this picture perfect moment.

The Sleeping Quarters
With wallpaper in both of the bedrooms, we knew we'd have to be flexible and move around as we made progress on the house. As the nights went on we kind of figured out what was comfortable for us (and Henry too!) but the idea was the same.. air mattress, old sheets and eventually a stiff neck..

night 1

night 3

night 6

he's in there.. I'm not kidding