Finally we installed some light fixtures! It's amazing what you get done inside when the weather is crummy. Ok so we didn't really accomplish that much- our workspace (aka the driveway) was rained out, but considering these light fixtures have been sitting around the house for 5 months, it felt like a lot more. I'm just thankful we don't have to jump over the boxes anymore..
We had to swag the bathroom fixture to allow clearance for the medicine cabinet to open..
A few touchups are needed but I'll get around to that.. eventually.
And it's amazing what a difference the sconces make in the living room. They're a huge improvement over the holes in the wall I've grown so used to. Not to mention the extra light was needed.
Next up we'll be installing the real mantel- I wrapped the old one in burlap because I just couldn't bear to look at the mint green molding anymore.
Showing posts with label bathroom. Show all posts
Monday, June 14, 2010
Tuesday, May 11, 2010
landscaping update
Since I last posted (three weeks ago!) we've been busy working on the yard and finishing up a few odds and ends in the house, but mostly we've just had some really fun visitors.. hence the lack of updates and small amounts of work that have been accomplished.
In the Yard..
This is our attempt at laying a patio..
Sad I know, but this is why.. When discussing landscaping we always knew exactly where we wanted to put a patio. We were both looking forward to taking advantage of an outdoor space, but because patios are hard to do (and very time consuming) we figured it would be a project for next year. Basically the area would have to be cleared of the MANY tree stumps, the ground would have to be levelled- and with all of the other work that still has to be done to the outside of the house, we put that all on the back burner.. until we found this..
What we thought was a random cement slab that we could break up and haul away turned out to be what we think is an abandoned sewer. While it may in fact have served a different purpose originally (if there's anyone more familiar with the history of our neighborhood who knows exactly what it is please email us!), we knew that no matter it was, it had to stay- and suddenly that became the new location of our patio! And not only that- while originally we had opted to be patient and do the patio the right way in a year or so, it suddenly became a priority for us to cover up the horrible manhole. So, we went to Home Depot and came home with a truck load of pavers..
While I won't go into detail about how we actually installed the patio since it was wrong and no one should ever do it that way- I'll share the highlights.. just remember, we had lots of things working against us, tree stumps, manholes and all..
I unloaded the truck as Ben moved the pavers to our patio site..
Don't worry there weren't any pavers in there while he was taking Henry for a spin.

Henry patiently looking on as I unloaded the truck.
As Ben poured a mixture of sand and top soil, I tried to level the surface (obviously unsuccessfully!)..

He then staked out the area..
It looks like Henry was watching Ben's every move but really he was just plotting when he could sneak in and and grab the orange string out of his hands. We wasted lots of time chasing him around the yard trying to get it back!

Once the pavers were down we dumped top soil over them. We're hoping to grow grass in between them to make it a more rustic and almost natural looking patio- not to mention we're hoping the grass will help to mask all the problem areas- and believe me, there are plenty to mask!
While our patio skills aren't exactly up to snuff, I also did a little planting- Ben did some more recently that I have yet to photograph. I was very proud of my work- I planted three peony bushes, two hydrangeas and two rose bushes (all by myself!). Below are the peonies that will hopefully bloom just in time for the summer of 2015..
Don't worry, I can't see them either.
In the House..
We've done minimal work in the house recently- with the beautiful weather we've had Ben and I have done everything in our power to work outside! But this past weekend he finished up installing the base molding in the bathroom..
And he was able to repair the window frame and install the new hardware..

I guess that means it's time for me to pull out the paint brush again..
In the Yard..
This is our attempt at laying a patio..
I unloaded the truck as Ben moved the pavers to our patio site..
As Ben poured a mixture of sand and top soil, I tried to level the surface (obviously unsuccessfully!)..
While our patio skills aren't exactly up to snuff, I also did a little planting- Ben did some more recently that I have yet to photograph. I was very proud of my work- I planted three peony bushes, two hydrangeas and two rose bushes (all by myself!). Below are the peonies that will hopefully bloom just in time for the summer of 2015..
In the House..
We've done minimal work in the house recently- with the beautiful weather we've had Ben and I have done everything in our power to work outside! But this past weekend he finished up installing the base molding in the bathroom..

I guess that means it's time for me to pull out the paint brush again..
Sunday, March 7, 2010
painting the bathroom
Still elbow deep in latex paint. To be honest we've taken a few days off- painting is exhausting! I would write that I have a new-found respect for professional painters, but in all honesty, I've always thought really good quality painters have to have incredible talent and patience.
Recently I'd been feeling like the bathroom paint job just wasn't up to par- I thought it needed something else.
So on a whim I decided to try something a little different..

I taped a 3" border around the perimeter of the bathroom- thinking it would accentuate all of the great angles in the bath.
And I continued the grey wall color on the ceiling- creating a great detail that surprisingly added a little visual height to the room.
We're still needing new window and door casings and the light fixture is in the attic waiting to be installed, but it's already a huge improvement!
Recently I'd been feeling like the bathroom paint job just wasn't up to par- I thought it needed something else.
So on a whim I decided to try something a little different..
And I continued the grey wall color on the ceiling- creating a great detail that surprisingly added a little visual height to the room.
We're still needing new window and door casings and the light fixture is in the attic waiting to be installed, but it's already a huge improvement!
Friday, December 18, 2009
frozen pipes.. yuck!
We knew it was a possibility.. I guess crossing our fingers didn't help much, but at least they didn't burst, right?
Ben woke up this morning to discover we couldn't use the shower because our cold water pipe was frozen solid. No we weren't shocked since the pipes back up to the garage where there is no heat or room for insulation. We had planned on installing heat trace around the pipes anyway, but the temperature dropped a little too quickly and we never actually got to cross that off our list. So as the temperatures dropped way into the single digits (weren't we at 2 degrees last night?) the water began to froze.
So tonight, when Ben got home from work he spent what seemed like hours positioned "in" the wall like so..
wrapping the pipes with heat trace- a wire that conducts heat, then wrapping the wires with insulation in hopes that tonight's 5 degree temperatures don't cause another freeze.
Ben woke up this morning to discover we couldn't use the shower because our cold water pipe was frozen solid. No we weren't shocked since the pipes back up to the garage where there is no heat or room for insulation. We had planned on installing heat trace around the pipes anyway, but the temperature dropped a little too quickly and we never actually got to cross that off our list. So as the temperatures dropped way into the single digits (weren't we at 2 degrees last night?) the water began to froze.
So tonight, when Ben got home from work he spent what seemed like hours positioned "in" the wall like so..
Monday, November 30, 2009
a working bathroom
The holiday threw us off a bit. Our week was filled with holiday celebrations (and lots of food) leaving me with no time to update the blog. But we are definitely still making progress on the house.
Here's a quick update on the renovation of the bathroom.. we aren't quite there yet, but we're definitely on our way!
floor
We survived the lack of toilet and it was all worth it. Once Ben finished the floor prep the tile went in- we opted to have a professional do it this time around.
It turned out really well and after we let it set for a night on the following afternoon the toilet and pedestal were installed once again.

medicine cabinet
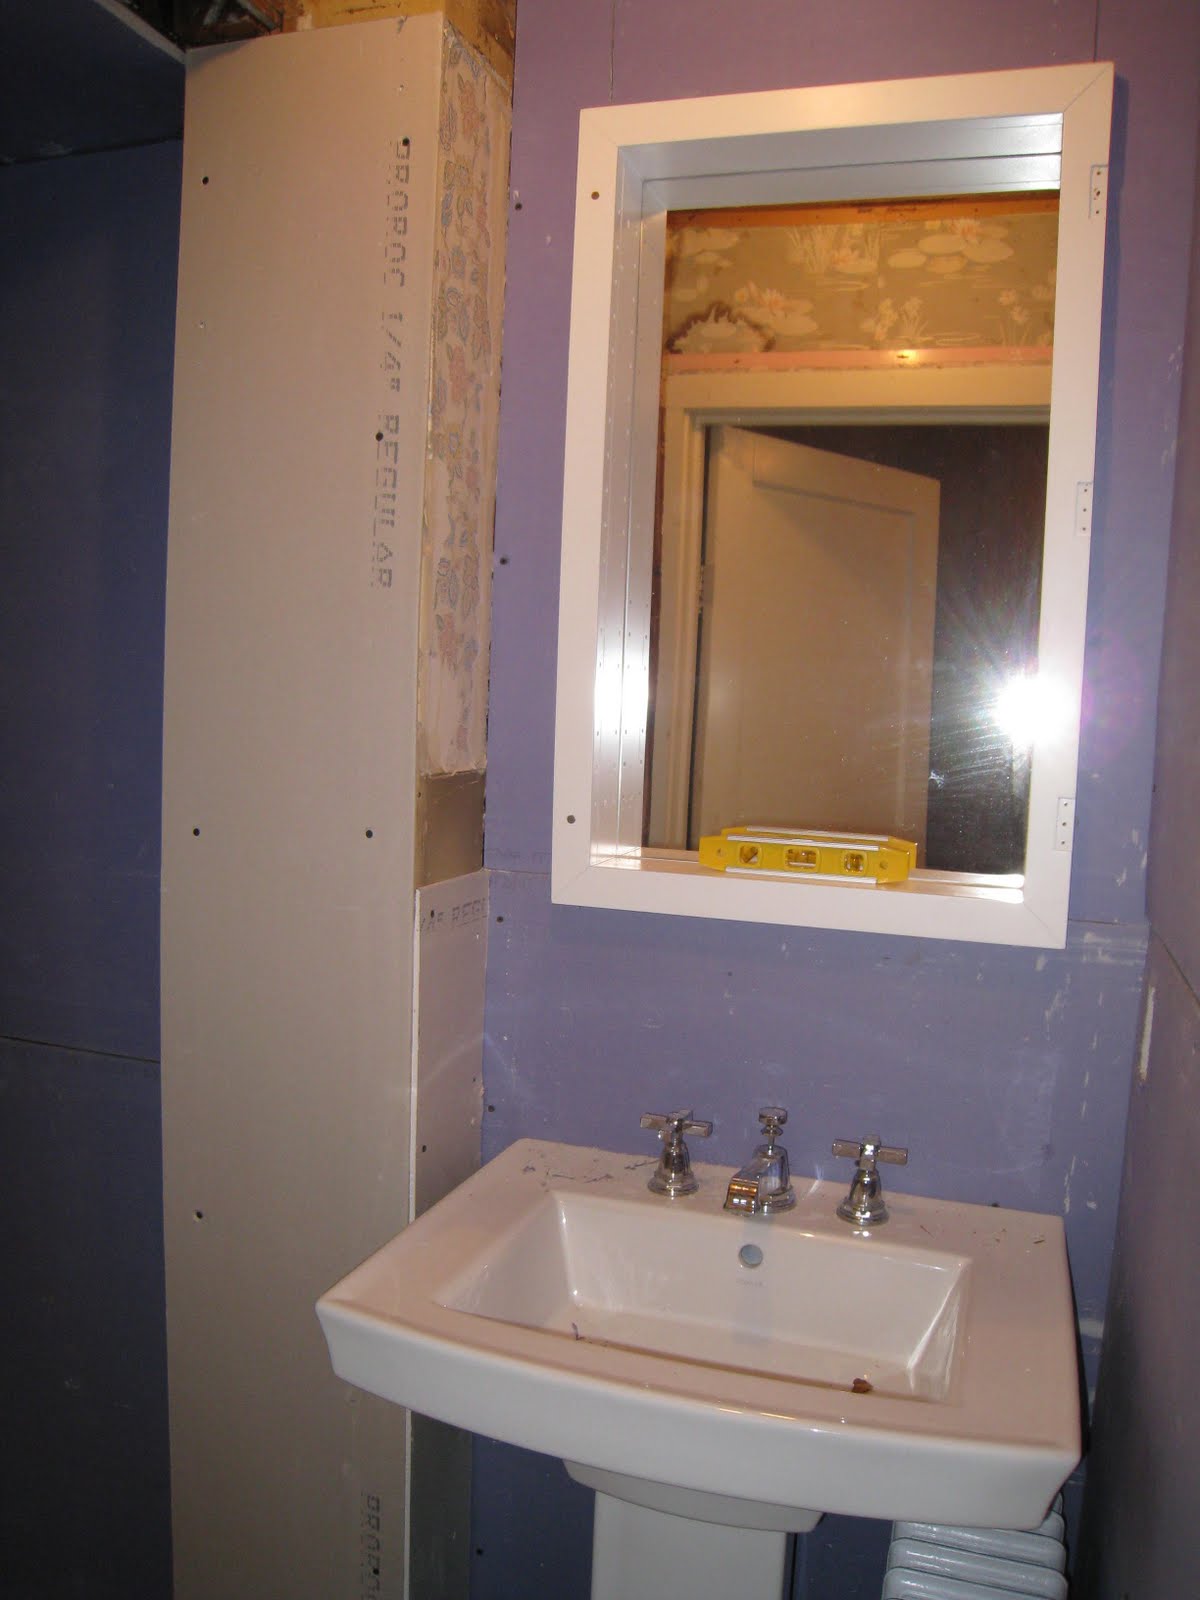
With the floor done, it was time to finish up the walls and install the much needed medicine cabinet. We've been without a mirror in the bathroom since we first started demo weeks ago. But before the mirror could be installed the studs had to be reworked to make room for it.
Originally the studs were positioned running vertically up the wall, not allowing any room for the cabinet.
Ben had to cut out the 2x4 that ran up the center and framed the area around the medicine cabinet..
With the studs reconfigured, Ben installed sheetrock and we screwed in the medicine cabinet.
Notice we removed the door (at the suggestion of Restoration Hardware). Originally Ben thought it would be impossible to reinstall the door and he wanted to keep it intact, but because the weight of the door was so heavy I thought we should follow the directions. Another little side note: we photographed the level on purpose. Ben said he never knew the bubble could actually make it to the middle of the center lines..
And finally what I consider our "finished" bathroom..
Yes there is still a long way to go- the taping and sanding of the walls, finish paint and moldings. We even need a light fixture. But we're thrilled with the outcome- especially considering what we started with.

Next up..
The fireplace is almost ready.. and just in time for the winter weather.
Here's a quick update on the renovation of the bathroom.. we aren't quite there yet, but we're definitely on our way!
floor
We survived the lack of toilet and it was all worth it. Once Ben finished the floor prep the tile went in- we opted to have a professional do it this time around.
It turned out really well and after we let it set for a night on the following afternoon the toilet and pedestal were installed once again.
medicine cabinet
With the floor done, it was time to finish up the walls and install the much needed medicine cabinet. We've been without a mirror in the bathroom since we first started demo weeks ago. But before the mirror could be installed the studs had to be reworked to make room for it.
Originally the studs were positioned running vertically up the wall, not allowing any room for the cabinet.
Ben had to cut out the 2x4 that ran up the center and framed the area around the medicine cabinet..
With the studs reconfigured, Ben installed sheetrock and we screwed in the medicine cabinet.
Notice we removed the door (at the suggestion of Restoration Hardware). Originally Ben thought it would be impossible to reinstall the door and he wanted to keep it intact, but because the weight of the door was so heavy I thought we should follow the directions. Another little side note: we photographed the level on purpose. Ben said he never knew the bubble could actually make it to the middle of the center lines..And finally what I consider our "finished" bathroom..
Yes there is still a long way to go- the taping and sanding of the walls, finish paint and moldings. We even need a light fixture. But we're thrilled with the outcome- especially considering what we started with.
Next up..The fireplace is almost ready.. and just in time for the winter weather.
Thursday, November 19, 2009
bathroom floor prep
14 hours down and 29 to go.. without a toilet of course! I must say that going without one when you're sleeping isn't a huge deal but getting up knowing you just have to hold it isn't the greatest way to wake up in the morning.
But the good news is the floor tile will be installed today! And once that sets the most challenging part of the renovation process will be done.. living without a kitchen is nothing compared to this.
So in an effort to prepare the floor for the tile Ben installed a new base floor and hardibacker last night.
Step 1- toilet and sink removal
Ben had asked the plumber to stop by yesterday afternoon and remove both the toilet and the pedestal. Unfortunately he never came so it was up to us to get it done. Obviously I don't have pictures of us taking them out (all hands were needed for the actual removal), but because there was still water in them we couldn't put them in the garage- Ben was worried they would freeze.
Doesn't everyone keep their toilet in the hall?
Step 2- base floor installation
Ben started installing the base on the pedestal side of the bathroom a couple of weeks ago, so last night he had to work in the toilet area.
Step 3- hardibacker
Once the base floor was down Ben had to cut the hardibacker. Unfortunately I didn't get pictures of that either (my documenting skills have been suffering recently), but when he was cutting the hole for the toilet one of the boards snapped in half. Once it was cut to fit he installed it by using a layer of thinset between the base and the hardibacker. The same thinset will be used for the tile installation.
You can see the crack around the toilet hole above. But because the tile we opted to go with is small he didn't think that little snafu would be a problem.
I must admit the clean hardibacker floor is a huge improvement from the original. Remember what we started with??
Let's just hope the plumber shows up to re-install the fixtures so we don't have to go the weekend without a toilet..
Side note: Not sure if you all noticed but we do have new sheetrock in the bathroom! The new professional installer (Ben) was busy earlier this week. There are still a few areas to go but we're on our way to a fully insulated bathroom, with walls no less!
But the good news is the floor tile will be installed today! And once that sets the most challenging part of the renovation process will be done.. living without a kitchen is nothing compared to this.
So in an effort to prepare the floor for the tile Ben installed a new base floor and hardibacker last night.
Step 1- toilet and sink removal
Ben had asked the plumber to stop by yesterday afternoon and remove both the toilet and the pedestal. Unfortunately he never came so it was up to us to get it done. Obviously I don't have pictures of us taking them out (all hands were needed for the actual removal), but because there was still water in them we couldn't put them in the garage- Ben was worried they would freeze.
Doesn't everyone keep their toilet in the hall?Step 2- base floor installation
Ben started installing the base on the pedestal side of the bathroom a couple of weeks ago, so last night he had to work in the toilet area.
Step 3- hardibacker
Once the base floor was down Ben had to cut the hardibacker. Unfortunately I didn't get pictures of that either (my documenting skills have been suffering recently), but when he was cutting the hole for the toilet one of the boards snapped in half. Once it was cut to fit he installed it by using a layer of thinset between the base and the hardibacker. The same thinset will be used for the tile installation.
Let's just hope the plumber shows up to re-install the fixtures so we don't have to go the weekend without a toilet..
Side note: Not sure if you all noticed but we do have new sheetrock in the bathroom! The new professional installer (Ben) was busy earlier this week. There are still a few areas to go but we're on our way to a fully insulated bathroom, with walls no less!
Tuesday, November 17, 2009
insulating the bathroom
We're at a point where we have so much to do we can't decide what should be done next. We know we have to demolish the kitchen walls- gut it entirely, so that the electrician can get in there and do his thing before the cabinets are delivered on December 11th. But I refuse to tear down the walls in the kitchen before we finish the bathroom- the idea of two exposed rooms during some of the coldest months terrifies me. So in an effort to rush and get stuff done in the bathroom Ben began insulating the remaining walls last night.

He also did a little demo on the areas that still had old sheetrock so that tomorrow night he can work on closing them all up..

The wall over the sink is all set for our new medicine cabinet (it arrived today)..
We opted to go with Restoration Hardware's frameless inset cabinet. It's just so much heavier than we thought it would be so we're also going to have to install some additional support so that it doesn't just rip right out of the wall.
If you've been following our adventures from the beginning I'm sure you'll remember that originally we weren't going to do a medicine cabinet (you can read about it here). Originally I was hoping to install a floor to ceiling cabinet with a flush door. Unfortunately plans changed when the electrical wiring was installed where the cabinet was supposed to go- we didn't really think about light switches until the electrician started. So once the switches were installed Ben and I started thinking about a new storage solution. I have always loved the quality of Restoration Hardware bathware, so once we decided the easiest, fastest and most practical solution for us was a medicine cabinet, RH was the only place I considered looking. I loved the simplicity of the frameless option and luckily they offered a large and small version. With our added height (you can read about demolishing the dropped ceiling here), and with our need for storage, I obviously went with their biggest size. And now our 70 lb. medicine cabinet awaits while the rest of the sheetrock is installed.
What the rest of our week looks like..
On Wednesday the plumber returns to remove the toilet and pedestal.. The floor tile will be installed on Thursday and by Friday evening we should have a working bathroom once again.
In the meantime I'm considering taking a mini vacation while the toilet is inoperable. Any suggestions?


We opted to go with Restoration Hardware's frameless inset cabinet. It's just so much heavier than we thought it would be so we're also going to have to install some additional support so that it doesn't just rip right out of the wall.If you've been following our adventures from the beginning I'm sure you'll remember that originally we weren't going to do a medicine cabinet (you can read about it here). Originally I was hoping to install a floor to ceiling cabinet with a flush door. Unfortunately plans changed when the electrical wiring was installed where the cabinet was supposed to go- we didn't really think about light switches until the electrician started. So once the switches were installed Ben and I started thinking about a new storage solution. I have always loved the quality of Restoration Hardware bathware, so once we decided the easiest, fastest and most practical solution for us was a medicine cabinet, RH was the only place I considered looking. I loved the simplicity of the frameless option and luckily they offered a large and small version. With our added height (you can read about demolishing the dropped ceiling here), and with our need for storage, I obviously went with their biggest size. And now our 70 lb. medicine cabinet awaits while the rest of the sheetrock is installed.
What the rest of our week looks like..
On Wednesday the plumber returns to remove the toilet and pedestal.. The floor tile will be installed on Thursday and by Friday evening we should have a working bathroom once again.
In the meantime I'm considering taking a mini vacation while the toilet is inoperable. Any suggestions?
Tuesday, November 10, 2009
tiling the bathroom
We were lucky enough to have a guest contractor this past weekend. Ben's friend Mike of Katek Construction in Ambler, Pennsylvania spent the weekend hard at work on our bathroom- showing Ben the correct tiling technique along the way.
But before the guys could get going on the tiling the plumber and electrician needed to get their stuff done while the walls were open and everything was exposed.
The Plumber
Much of the plumbers work happened in the basement. New piping was installed throughout the house- the old pipes were, just that.. very old! The water pressure was terrible because of the rust build up from age. While the new piping wasn't something that necessarily had to be done immediately we figured we might as well get it done while everything was open and exposed.
But the major more visible work that the plumber got done was relocating the sink and radiator. I first posted about the new layout here.
Originally the bathroom layout looked like this..
It was a little tight getting into the bathroom because the sink was practically installed in the middle of the doorway. And the awkward radiator placement felt like a huge waste of space.
So we opted to swap them and chose to go with a pedestal sink so we could put the radiator underneath it..
Actually planning out when we're going to get everything done is a little bit of a challenge since we are trying to do the work ourselves and because it's our only bathroom. We're trying to make it as functional as possible (I just can't let go of the toilet), so the plumber was nice enough to install the pedestal and the new toilet until we're ready to install the floor.
Above you can see the radiator hasn't been installed yet. The plumber pulled it out and kept it out long enough so I was able to give it a fresh new coat of paint. I must say it was a little challenging- not the painting, but cleaning it out enough beforehand (decades of dust collected in all of the little crevices).
But after some sanding, cleaning, a coat of primer and two coats of paint we now have a clean and very white radiator.
I just love it and can't wait to see it in place.
And of course what's a new bathroom without a new toilet?

The Electrician
The electrician has also been working all over the house. It wasn't surprising that lots of rewiring had to be done- and we opted to install new light fixtures to lots of very dark rooms in the house. But in the bathroom there were really only three major things we needed from him.
1. an outlet
Can you believe there wasn't one in there? He positioned it just to the right of the sink- so it's not a huge eyesore and but still in a convenient location.
2. an exhaust fan
Definitely something every bathroom should have. Installing an exhaust fan is a great way to help preserve the walls and keep moisture out of the space.
3. lighting
With the new high ceiling (you can read about it here) we opted to go with a flush mount fixture over the original recessed light we had discussed. Unfortunately I have yet to find one but I've told Ben from the beginning- I have no problem living with light bulbs, I just don't want to rush and buy something I don't absolutely love.
The Tile Guys
So on Friday both the electrician and the plumber finished up their work and Saturday morning Ben and Mike started in with the transformation.
Installing Insulation..
Because the sheetrock had been removed it gave them the perfect opportunity to insulate the walls. Now we'll have a very toasty bathroom!
Installing the Hardibacker..
After the insulation they installed hardibacker around the tub walls. The hardibacker is much stronger than sheetrock- it will hold up against mildew and mold.
Tiling..
Once the hardibacker was up they started the very slow process of tiling.
It truly was a two man job. Mike cut while Ben tiled.


Unfortunately the tiling took so long they were able to finish the installation but they didn't get to the grout. Luckily Ben was feeling like that was something he could handle by himself and last night he finished it up..
Spreading the Grout..
We opted to go with a grey grout- I love the contrast with the white subway tiles.
Once the grout was spread and covered the entire area, Ben washed it off and we got a hint of the finished product.
Wiping Down with Cheese Cloth..
I'll post the big "reveal" when the bathroom is complete, but at least you got a peek.
We want to send a quick thanks to Mike for his amazing help this weekend. Unfortunately we weren't such great hosts this time around- without a kitchen he didn't get the fresh baked goods he's gotten used to over the years and Ben put him to work all weekend. But we so appreciate all he did to make this process much less painful than it could have been. At least next time he comes to visit he'll get to take a shower! Thanks Mike!
And now on to the floor..
But before the guys could get going on the tiling the plumber and electrician needed to get their stuff done while the walls were open and everything was exposed.
The Plumber
Much of the plumbers work happened in the basement. New piping was installed throughout the house- the old pipes were, just that.. very old! The water pressure was terrible because of the rust build up from age. While the new piping wasn't something that necessarily had to be done immediately we figured we might as well get it done while everything was open and exposed.
But the major more visible work that the plumber got done was relocating the sink and radiator. I first posted about the new layout here.
Originally the bathroom layout looked like this..
It was a little tight getting into the bathroom because the sink was practically installed in the middle of the doorway. And the awkward radiator placement felt like a huge waste of space.
So we opted to swap them and chose to go with a pedestal sink so we could put the radiator underneath it..
Actually planning out when we're going to get everything done is a little bit of a challenge since we are trying to do the work ourselves and because it's our only bathroom. We're trying to make it as functional as possible (I just can't let go of the toilet), so the plumber was nice enough to install the pedestal and the new toilet until we're ready to install the floor.And of course what's a new bathroom without a new toilet?
The Electrician
The electrician has also been working all over the house. It wasn't surprising that lots of rewiring had to be done- and we opted to install new light fixtures to lots of very dark rooms in the house. But in the bathroom there were really only three major things we needed from him.
1. an outlet
2. an exhaust fan
3. lighting
The Tile Guys
So on Friday both the electrician and the plumber finished up their work and Saturday morning Ben and Mike started in with the transformation.
Installing Insulation..
Because the sheetrock had been removed it gave them the perfect opportunity to insulate the walls. Now we'll have a very toasty bathroom!Installing the Hardibacker..
Tiling..


Spreading the Grout..
We want to send a quick thanks to Mike for his amazing help this weekend. Unfortunately we weren't such great hosts this time around- without a kitchen he didn't get the fresh baked goods he's gotten used to over the years and Ben put him to work all weekend. But we so appreciate all he did to make this process much less painful than it could have been. At least next time he comes to visit he'll get to take a shower! Thanks Mike!
And now on to the floor..
Labels:
bathroom,
electrician,
katek construction,
plumber,
tile
Subscribe to:
Posts (Atom)