As I had mentioned in previous posts we've been working on the kitchen in preparation for the cabinet installation. In the last few days three projects have really taken over.
The CeilingOnce we decided to go with the rustic paneled ceiling look (something I first saw and posted about
here) we quickly got to work. Last week I took a trip to
Allerdice and looked at a few boards that we thought might work. We were limited on the depth of the boards since the cabinets have already been ordered and delivered.
We ended up going with an 8" tongue and groove pine plank. I posted about it getting acclimated
here.
The installation went pretty quickly, one board at a time. While a few were slightly warped and gave us a little bit of a challenge in the end we decided any uneven gaps just added to the "rustic" feel.
The installation took place one step at a time..
1. Ben cut each to the width of the room- we measured each one beforehand to try to prevent any major mistakes.
2. We then applied sub floor adhesive to the back of the board- an extra step and probably not a necessary one, but it made us feel a little better about them staying in place.
3. On ladders we each took an end of the board and used mallets to fit the boards together.
4. With the board up Ben used a nail gun (pictured below) to nail the boards into place.. After the first couple of boards I decided the nail gun wasn't for me.


I'm pretty sure this is Ben trying to hammer in one of the my nails...

We were able to get a little variation in the color of the boards, but they're still a little too "golden" for me, so I'm planning on lightly staining them with a custom stain we've already purchased.
 The Radiator
With the cabinets still in the garage we felt like this was our opportunity to finally clean up the radiator and spray it before everything was put in it's place.
Before I got sanding, I protected the floors and walls and the functional parts of the radiator that couldn't be painted.

To prep for the painting I first used a compressor on the radiator to remove all the loose dust and dirt. Then I sanded to get rid of the old chipped paint and any extra dirt. After the sanding process was over I wiped the unit down with bleach and once it was dry I primed it with a spray primer.

With the primer dry I started spraying it with the semi gloss white paint. I went over it and over it- going through three cans, but in the end I was pleased with the result.
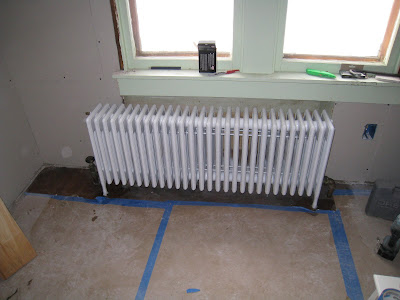
But then again, anything beats what we started with.
The WindowsI'm in the process of working on sanding the windows before the cabinets go in- anything to prevent more mess once we can finally put things away!

I still have two and a half windows to go- its been a little bit of a challenge because of the layers and layers of old paint. Not to mention I take frequent breaks- even with a dust mask, working with old lead paint isn't fun!
I know I won't get to painting them before the cabinets go in, but we're going to replace the window and door casings after the installation so I'll plan on doing all of the painting at once. Definitely looking forward to getting rid of the minty green!
 and Ben sent me pictures of the progress along the way..
 We decided to replace them because the house was already going to be a mess and it just seemed like the right time to do it.
 living room (aka Ben's living quarters)
 office
 kitchen
 bedroom
 bathroom
 A huge improvement over the grey sheetrock we've grown so used to.
 bathroom
 bedroom
 office
 kitchen


